Snowblower — a Process Flow Diagram
Overview
A class assignment to design a process flow diagram (snowthrower) that provided an end user with:
Level 1: Must Haves
- Steps (Solicit and collect, Respond and instruct)
- Start and End (Work right to left or top to bottom, Accentuate the start and end points)
- Paths
- Name
- Decision points
Level 2: Groupings (swimlanes) & Erroring
- Distinguish steps
- Step details
- Path details
- Swimlanes
- Other groupings
Level 3: Further Context
- Connections to other flows
- User motivations
- Screen identifiers
- Remaining questions
Project:
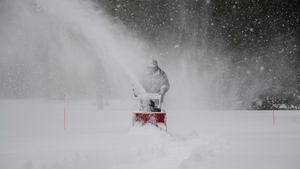
I chose the process of preparing and using a snow thrower during a snow event. In order to get a better grasp as to how one would go about using a snowblower in a snow event, it just so happened that in a couple of days, Chicago was gearing up for some rather wicked weather. I took this opportunity to document my own processes during this event as well as reference an owners manual for some of the details that one takes for grant it as they painfully rid their surroundings of snow.
Process:
After the snow event I sat down and wrote out my process in outline form.
- General Preparation
- Check Tire Pressure
- Check tire pressure - CORRECT or LOW
- Adjust to pressure listing on tire sidewall - inflate and recheck
- Check Track Tension
- Check tracking of unit and tension the tracks as needed
- Check Auger Gearcase Oil
- Check oil level in auger gearcase to specs - CORRECT or LOW
- Adjust by filling to spec limit
- Check Engine Crankcase Oil
- Check engine oil level - CORRECT or LOW
- Adjust by filling to spec limit
- Check Engine Fuel Tank
- Check fuel tank level - FULL - EMPTY
- Adjust by filling tank to FULL
- Check Tire Pressure
- General Engine Preparation
- Ignition Switch - Key
- STOP - pulled out
- *RUN - pushed in
- Engine Shut-off Switch
- STOP - toggle up
- *RUN - toggle down
- Fuel Shut-off Valve
- CLOSED - used to store unit
- *OPEN - used to run unit
- Ignition Switch - Key
- Starting
- Place discharge chute straight ahead
- Clutch lever disengaged
- Traction drive lever disengaged
- Choke
- Engine cold
- *START - chokes off air for start, then gradually open after start
- Engine warm
- RUN - normal operation
- Engine cold
- Primer Bulb
- Push primer bulb to add fuel ( 2-3Xs)
- Recoil Starter Handle
- Grasp starter handle
- Pull rope
- Rope rewinds
- Repeat until starts
- Electric Starter
- Connect extension cord to starter
- Connect extension cord to wall outlet
- Press starter button until engine starts
- Choke
- Adjust choke settings as needed
- Snow Removal
- Adjust discharge chute left or right
- Select Speed Control position (1-7)
- Select Speed control direction (FWD or REV)
- Engage impeller lever
- Engage traction drive lever
- Clear path
- Snow removed?
- Turn around repeat
- Complete
- Release traction drive lever
- Run impeller until snow is gone
- Release impeller lever
- Ignition switch to stop engine
- Remove Key
- Clean snow off blower
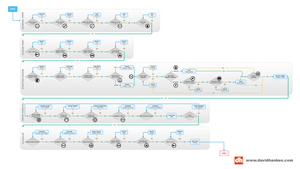
Design
Having to describe some action, I thought the experience might be easier to design the process flow diagram with the use of universal symbols found on that actual machine. I either found the ISO symbols or had to create them using Adobe Illustrator.


The final process took the outline and ISO images and I created the process flow diagram using all elements from Levels 1-3. In addition, used the Axure RP Pro application to design and assemble the final diagram. This final project may be viewed on my Axure share.